Mikrotik HTB Concept
Monday, April 13, 2009Theory
From wiki.mikrotik.com
Structure
Hierarchical Token Bucket (HTB) allows to create a hierarchical queue structure and determine relations between queues, like “parent-child” or “child-child”.
As soon as queue has at least one child it becomes a inner queue, all queues without children - leaf queues. Leaf queues make actual traffic consumption, Inner queues are responsible only for traffic distribution. All leaf queues are treated on equal basis.
In RouterOS it is necessary to specify parent option to assign queue as a child to other queue
Dual Limitation
Each queue in HTB has two rate limits:
- CIR (Committed Information Rate) – (limit-at in RouterOS) worst case scenario, flow will get this amount of traffic no matter what (assuming we can actually send so much data)
- MIR (Maximal Information Rate) – (max-limit in RouterOS) best case scenario, rate that flow can get up to, if there queue’s parent has spare bandwidth
In another words, at first limit-at (CIR) of the all queues will be satisfied, only then child queues will try to borrow the necessary data rate from their parents in order to reach their max-limit (MIR).
Note: CIR will be assigned to the corresponding queue no matter what. (even if max-limit of the parent is exceeded)
That is why, to ensure optimal (as designed) usage of dual limitation feature, we suggest to stick to these rules:
- Sum of committed rates of all children must be less or equal to amount of traffic that is available to parent.
-
- CIR(parent)* ≥ CIR(child1) +…+ CIR(childN)
- *in case if parent is main parent CIR(parent)=MIR(parent)
- CIR(parent)* ≥ CIR(child1) +…+ CIR(childN)
- Maximal rate of any child must be less or equal to maximal rate of the parent
-
- MIR (parent) ≥ MIR(child1) & MIR (parent) ≥ MIR(child2) & … & MIR (parent) ≥ MIR(childN)
Queue colors in Winbox:
- 0% - 50% available traffic used - green
- 51% - 75% available traffic used - yellow
- 76% - 100% available traffic used - red
Priority
We already know that limit-at (CIR) to all queues will be given out no matter what.
Priority is responsible for distribution of remaining parent queues traffic to child queues so that they are able to reach max-limit
Queue with higher priority will reach its max-limit before the queue with lower priority. 8 is the lowest priority, 1 is the highest.
Make a note that priority only works:
- for leaf queues - priority in inner queue have no meaning.
- if max-limit is specified (not 0)
Examples
In this section we will analyze HTB in action. To do that we will take one HTB structure and will try to cover all the possible situations and features, by changing the amount of incoming traffic that HTB have to recycle. and changing some options.
Structure
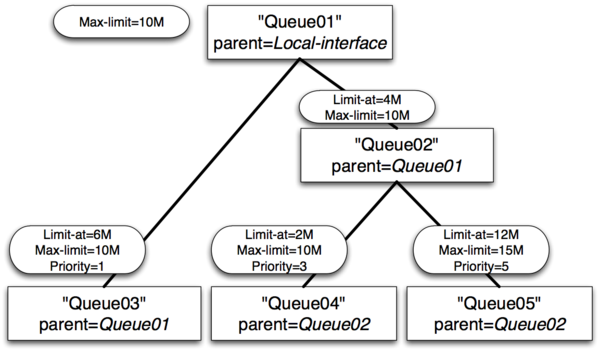
Our HTB structure will consist of 5 queues:
- Queue01 inner queue with two children - Queue02 and Queue03
- Queue02 inner queue with two children - Queue04 and Queue05
- Queue03 leaf queue
- Queue04 leaf queue
- Queue05 leaf queue
Queue03, Queue04 and Queue05 are clients who require 10Mbps all the time Outgoing interface is able to handle 10Mbps of traffic.
Example 1 : Usual case

- Queue01 limit-at=0Mbps max-limit=10Mbps
- Queue02 limit-at=4Mbps max-limit=10Mbps
- Queue03 limit-at=6Mbps max-limit=10Mbps priority=1
- Queue04 limit-at=2Mbps max-limit=10Mbps priority=3
- Queue05 limit-at=2Mbps max-limit=10Mbps priority=5
Result of Example 1
- Queue03 will receive 6Mbps
- Queue04 will receive 2Mbps
- Queue05 will receive 2Mbps
- Clarification: HTB was build in a way, that, by satisfying all limit-ats, main queue no longer have throughput to distribute
Example 2 : Usual case with max-limit

- Queue01 limit-at=0Mbps max-limit=10Mbps
- Queue02 limit-at=4Mbps max-limit=10Mbps
- Queue03 limit-at=2Mbps max-limit=10Mbps priority=3
- Queue04 limit-at=2Mbps max-limit=10Mbps priority=1
- Queue05 limit-at=2Mbps max-limit=10Mbps priority=5
Result of Example 2
- Queue03 will receive 2Mbps
- Queue04 will receive 6Mbps
- Queue05 will receive 2Mbps
- Clarification: After satisfying all limit-ats HTB will give throughput to queue with highest priority.
Example 3 : Inner queue limit-at

- Queue01 limit-at=0Mbps max-limit=10Mbps
- Queue02 limit-at=8Mbps max-limit=10Mbps
- Queue03 limit-at=2Mbps max-limit=10Mbps priority=1
- Queue04 limit-at=2Mbps max-limit=10Mbps priority=3
- Queue05 limit-at=2Mbps max-limit=10Mbps priority=5
Result of Example 3
- Queue03 will receive 2Mbps
- Queue04 will receive 6Mbps
- Queue05 will receive 2Mbps
- Clarification: After satisfying all limit-ats HTB will give throughput to queue with highest priority. But in this case inner queue Queue02 had limit-at specified, by doing so, it reserved 8Mbps of throughput for queues Queue04 and Queue05. From these two Queue04 have highest priority, that is why it gets additional throughput.
Example 4 : Leaf queue limit-at
- Queue01 limit-at=0Mbps max-limit=10Mbps
- Queue02 limit-at=4Mbps max-limit=10Mbps
- Queue03 limit-at=6Mbps max-limit=10Mbps priority=1
- Queue04 limit-at=2Mbps max-limit=10Mbps priority=3
- Queue05 limit-at=12Mbps max-limit=15Mbps priority=5
Result of Example 4
- Queue03 will receive ~3Mbps
- Queue04 will receive ~1Mbps
- Queue05 will receive ~6Mbps
- Clarification: Only by satisfying all limit-ats HTB was forced to allocate 20Mbps - 6Mbps to Queue03, 2Mbps to Queue04, 12Mbps to Queue05, but our output interface is able to handle 10Mbps. As output interface queue is usually FIFO throughput allocation will keep ratio 6:2:12 or 3:1:6
SSH BruteForce Attack
This capture ip Brute Force otentikasi service SSH on Port 22, using Broadband ADSL, with PortForwarding on Modem ADSLnya to Router Mikrotik. port 22 we move to 222

Firewall pada mikrotik diproses berurutan dari Atas ke Bawah, biasanya bagi yang baru memakai Mikrotik, dengan settingan Firewall Filternya kopi pastean, sering tidak urut. Membuat proses filter ini tidak berhasil.
add chain=input protocol=tcp dst-port=22 src-address-list=ssh_blacklist \
  action=drop comment="Drop SSH brute forcers" disabled=no
add chain=input protocol=tcp dst-port=22 connection-state=new \
  src-address-list=ssh_stage3 action=add-src-to-address-list \
  address-list=ssh_blacklist address-list-timeout=1w3d comment="" \
  disabled=no
add chain=input protocol=tcp dst-port=22 connection-state=new \
  src-address-list=ssh_stage2 action=add-src-to-address-list \
  address-list=ssh_stage3 address-list-timeout=1m comment="" disabled=no
add chain=input protocol=tcp dst-port=22 connection-state=new \
  src-address-list=ssh_stage1 action=add-src-to-address-list \
  address-list=ssh_stage2 address-list-timeout=1m comment="" disabled=no
add chain=input protocol=tcp dst-port=22 connection-state=new \
  action=add-src-to-address-list address-list=ssh_stage1 \
  address-list-timeout=1m comment="" disabled=no

Speedy Error Message
Saturday, April 11, 2009
Error 678
Follow this steps :
Step 1: Turn On Modem ADSL
1.See adsl modem ON (Not blinking) before you dial
Step 2 : Reset winsock TCP/IP
1.Click start -> Click Run -> tipe netsh winsock reset and than enter
2.When command prompt window up again, restart computer
3.Try ping to Modem and Try connection diaol again.
Step 3: setting Modem adsl
1.Login to Gateway Modem via Browser exp: 192.168.1.1
Pic : VPI : 8 / VCI : 81 (for Bandung)
- Encapsulation : LLC
- Type Koneksi : Bridge
2 . If Not Work try to Reset you Modem and setting adsl Ruter again.
ERROR 769
Chek LAN computer:
1. Click start menu
2. Click Control Panel

3. Click Network Connection

- Click Local Area Connection
- - -> Click Right and than ENABLE.

Error 619/691 Dial Broadband
remplaza_fecha(’8:41 AM’);

ERROR 619/691
Try Create New Connection at computer :
1.Click start menu
2.Click Control Panel

3.Click Network Connection
 4. Click ‘create a new connectio ->NEXT
5. Clcik connect to the internet àNEXT
 6.Click setup my connection manually ->NEXT
7. Click connect using a broadband connection that requires a username and password -> NEXT

8.ISP Name:speedy -> NEXT

9.Username:1311XXXXXX@telkom.net
Password:XXXXXXX -> NEXT
10.Check list Add a shortcut to this connection to my dekstop.

11.Click Finish.
12.Click icon speedy at dekstop 13.Click connect
This can be resolved by following these steps:
· Restart your computer and wait until all applications have completely loaded before trying to reconnect.
· If your problem has still not been resolved uninstall and reinstall your Broadband modem. For information on how to do this please refer to the ADSL modem setup instructions or the installation cd that was provided with your modem
Usually this is a one-off glitch which happens when the Connection Progress is interrupted by the user or another program on the PC. In order to resolve this:
· Restart your computer and wait until all applications have completely loaded before trying to reconnect.
Error 633 -The port is already in use / not configured for Remote Access Dialout
remplaza_fecha(’3:11 PM’);
This error can be best remedied by: · A restart of your computer tends to resolve 50% of cases with this error message · Disable any Firewall Software and try to connect again… · Try uninstalling and reinstalling the Modem. For information on how to do this please refer to the ADSL modem setup instructions or the installation cd that was provided with your modem.
Error 645 - Internal Authentication Error
This problem tends to occur when using Windows 98 or Windows ME. This can be resolved by following these steps:
· Try uninstalling and reinstalling the Modem. For information on how to do this please refer to the ADSL modem setup instructions or the installation cd that was provided with your modem.
· Windows 95/98 - This error can occur if the ‘Require encrypted password’ option is enabled on the ‘Server Types’ tab in the connection’s properties, or an incorrect user name or password have been entered. See MS KB Article Q199780
· All versions of Windows - This error can occur if you are attempting to connect to a Windows 2000 domain that has had a RRAS (Routing and Remote Access Services) server log on without administrative privileges. See MS KB Article 227747
Error 651 - Your modem has reported an error
remplaza_fecha(’3:15 PM’);
This error usually occurs with Windows 2000 when the Internet connection has become corrupted. This can be resolved by following these steps:
· Try uninstalling and reinstalling the Modem. For information on how to do this please refer to the ADSL modem setup instructions or the installation cd that was provided with your modem.
Error 680 - No dial tone
remplaza_fecha(’3:19 PM’);
This error usually means there is a problem receiving the Broadband signal at your modem. An error 680 / 619 would usually also mean you do not have a solid green ADSL light on the modem. This can be resolved by following these steps:
Ensure you have checked the following:
· Does your telephone Work? (if not you may have a fault with your telephone line)
· Is the cable from the modem to the filter secure at each end?
· Are you using a home-made extension line? Broadband requires a solid copper (round) extension.
Error 680 and both modem lights are solid green
If the modem installation seems successful and you have two solid green lights on your modem but are still receiving the error message- 680: No dial tone, then:
· If you have an internal 56k modem please disable the modem as follows
o Right click on the My Computer Icon on your desktop and then select Properties
o If you have a Device Manager tab along the top select this, otherwise select the Hardware tab along the top and then click on the Device Manager button
o In the Device Manager click on the + sign on the Modem selection and then…
o Identify and right click your modem icon and select Disable / Properties and then Disable in this Hardware Profile
o After you have completed this, close down the Device Manager and then restart your computer and try to reconnect to the Broadband connection.
Error 797 - The connection failed because the modem or other connecting device failed
remplaza_fecha(’3:21 PM’);
This can be resolved by following these steps: · Restart your computer and wait until all applications have completely loaded before trying to reconnect. If your problem has still not been resolved uninstall and reinstall your Broadband modem. For information on how to do this please refer to the ADSL modem setup instructions or the installation cd that was provided with your modem
PC / Computer / Laptop Harus selalu di update antivirsu dan di scan • Cek computer from virus and spyware (with installing at computer).• example Antivirus software :– Avg free antivirus : http://free.grisoft.com– Avira antivirus : http://www.avira.com– Avast Antivirus : http://www.avast.com• Example AntiSpyware Software :– Microsoft Antispyware : http://www.Microsoft.com/OneCare– Spyware Doctor : http://www.pctools.com/spyware-doctor– Ad-aware : http://www.lavasoftusa.com• Diatas adalah beberapa Link antivirus yang bisa anda gunakan
ROUTER COMMANDS
Sunday, February 1, 2009ROUTER COMMANDS
TERMINAL CONTROLS:
· Config# terminal editing - allows for enhanced editing commands
· Config# terminal monitor - shows output on telnet session
· Config# terminal ip netmask-format hexadecimal|bit-count|decimal - changes the format of subnet masks
HOST NAME:
· Config# hostname ROUTER_NAME
BANNER:
· Config# banner motd # TYPE MESSAGE HERE # - # can be substituted for any character, must start and finish the message